
Medidas: aprox. 18 x 18 cm
Materiales: 100 g color nº 12, rojo
100 g color nº 11, verde ópalo
AGUJA DE GANCHILLO TAMAÑO 4 mm – o el tamaño necesario para obtener 1 repetición de A.2 = ancho 4 cm.
Materiales: 100 g color nº 12, rojo
100 g color nº 11, verde ópalo
AGUJA DE GANCHILLO TAMAÑO 4 mm – o el tamaño necesario para obtener 1 repetición de A.2 = ancho 4 cm.
TIP PARA LA REALIZACIÓN DEL TRABAJO:
Cuando comenzamos una nueva fila con otro color, sustituir el 1er p.de cad de la fila por 1 p.e. para asegurar el hilo.
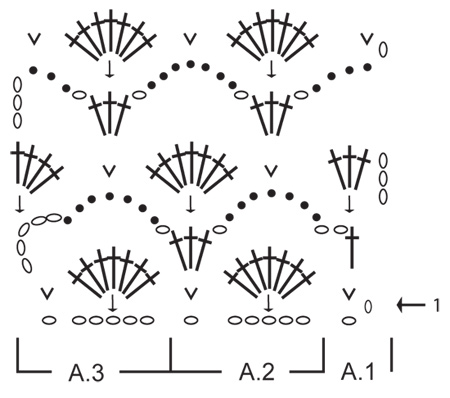
PATRÓN:
Ver los diagramas A.1-A.3.
---------------------------------------------------------------------------------------------
AGARRADOR:
Trabajar flojo 32 p.de cad en rojo con aguja de ganchillo tamaño 4 mm.
FILA 1 (= LR): Trabajar A.1, después trabajar A.2 un total de 4 vcs y finalizar con A.3. Cuando se ha trabajado el último p.b. de la fila, cortar el hilo. Girar la labor.
FILA 2 (= LD): Cambiar a verde ópalo - LEER TIP PARA LA REALIZACIÓN DEL TRABAJO y trabajar como sigue: 5 p.de cad, continuar con A.3, después trabajar A.2 un total de 4 vcs y finalizar con A.1 . Cortar el hilo.
FILA 3: Trabajar 3 p.de cad con rojo. Continuar de acuerdo con la fila 3 del patrón. Cuando se ha trabajado el último p.a. de la fila , cortar el hilo.
FILA 4: Trabajar 3 p.de cad con verde ópalo. Continuar con los diagramas A.3, A.2 y A.1 la fila entera como antes. Después de trabajar los últimos 4 p.a. de la fila como 1 p.a., cortar el hilo.
FILA 5: Trabajar un p.de cad con color rojo. Continuar con A.1, A.2 y A.3 hasta terminar la fila.
Después repetir las filas 2-5 hasta que la labor mida aprox 20 cm en vertical. ATENCIÓN! Recuerda cambiar el color en cada fila. Asegurar el hilo.
ARGOLLA: Asegurar el hilo con 1 p.e. con verde ópalo en el primer pt de la fila anterior en una esquina del agarrador. Ahora trabajar 14 p.de cad, y 1 p.b. en el primer pt (= argolla). Girar la labor y trabajar 14 p.b. en el arco (= argolla) y finalizar con 1 p.e. en el primer pt. Asegurar el hilo.
Cuando comenzamos una nueva fila con otro color, sustituir el 1er p.de cad de la fila por 1 p.e. para asegurar el hilo.
PATRÓN:
Ver los diagramas A.1-A.3.
---------------------------------------------------------------------------------------------
AGARRADOR:
Trabajar flojo 32 p.de cad en rojo con aguja de ganchillo tamaño 4 mm.
FILA 1 (= LR): Trabajar A.1, después trabajar A.2 un total de 4 vcs y finalizar con A.3. Cuando se ha trabajado el último p.b. de la fila, cortar el hilo. Girar la labor.
FILA 2 (= LD): Cambiar a verde ópalo - LEER TIP PARA LA REALIZACIÓN DEL TRABAJO y trabajar como sigue: 5 p.de cad, continuar con A.3, después trabajar A.2 un total de 4 vcs y finalizar con A.1 . Cortar el hilo.
FILA 3: Trabajar 3 p.de cad con rojo. Continuar de acuerdo con la fila 3 del patrón. Cuando se ha trabajado el último p.a. de la fila , cortar el hilo.
FILA 4: Trabajar 3 p.de cad con verde ópalo. Continuar con los diagramas A.3, A.2 y A.1 la fila entera como antes. Después de trabajar los últimos 4 p.a. de la fila como 1 p.a., cortar el hilo.
FILA 5: Trabajar un p.de cad con color rojo. Continuar con A.1, A.2 y A.3 hasta terminar la fila.
Después repetir las filas 2-5 hasta que la labor mida aprox 20 cm en vertical. ATENCIÓN! Recuerda cambiar el color en cada fila. Asegurar el hilo.
ARGOLLA: Asegurar el hilo con 1 p.e. con verde ópalo en el primer pt de la fila anterior en una esquina del agarrador. Ahora trabajar 14 p.de cad, y 1 p.b. en el primer pt (= argolla). Girar la labor y trabajar 14 p.b. en el arco (= argolla) y finalizar con 1 p.e. en el primer pt. Asegurar el hilo.
Diagrama

|
= | p.de cad. |

|
= | p.b. en el pt |

|
= | p.a. |

|
= | 7 p.a tejidos juntos en 1 p.a.: HEB, pasar el ganchillo por el 1er p.a., HEB, pasar el hilo, HEB pasar el hilo por los 2 pts del ganchillo, (HEB, pinchar el ganchillo en el sig p.a., HEB, pasar el hilo, HEB y pasar el hilo por los 2 bucles del ganchillo). Repetir (-) en cada uno de los sig 5 p.a., HEB y pasar el hilo por los 8 pts del ganchillo. |

|
= | FILA 1 comienza aquí = por el LR |

|
= | trabajar como cuando se trabajan 7 p.a. juntos en 1 p.a., pero repetir de (-) 1 vez = un total de 3 vcs |

|
= | trabajar como cuando 7 p.a. juntos en 1 p.a., pero repetir de (-) 2 vcs = un total de 4 vcs |
*********************************************************
INSTRUCTIONS IN ENGLISH
Measurements: approx. 18 x 18 cmMaterials: 100 g color no 12 , red100 g color # 11 , Green OpalCROCHET SIZE 4 mm - or size needed to get 1 repeat A.2 = 4 cm wide .
TIP FOR THE CONDUCT OF WORK:When we start a new row with a different color , replace the 1st row p.de cad for 1 pe to secure the thread .SKIPPER :View A.1- A.3 diagrams.-------------------------------------------------- -------------------------------------------GRAB :32 work lazy p.de cad red with crochet hook size 4 mm.ROW 1 (= WS): Work A.1, A.2 work after about 4 vcs and end with A.3. When you have worked the last bp row , cut the thread . Turn the work .ROW 2 (= RS): Change to Green Opal - READ TIP FOR MAKING WORK and work as follows : 5- p.de cad , continue A.3, A.2 work after about 4 vcs and end with A .1 . Cut the thread .ROW 3: Work 3 p.de cad red. Proceed according to pattern row 3 . When you have worked the last p.a. row , cut the thread .ROW 4: Working 3 p.de cad green opal. Continue with A.3 , A.2 and A.1 plots the entire row as before. After working the last 4 p.a. row to 1 p.a. , cut the thread .ROW 5: Work with one p.de cad red. Continue A.1 , A.2 and A.3 to end the row.Then repeat rows 2-5 until work measures approx 20 cm vertically. ATTENTION ! Remember to change the color in each row. Secure the thread.RING : Ensure the wire with 1 e.g. green opal in first st of the previous row in the corner of the gripper . Now work 14 p.de cad , and 1 bp in first st ( = ring ) . Turn work and work 14 bp on the arc ( = ring ) and finish with 1 e.g. in first st . Secure the thread.diagram= P.de cad.Bp = pt in= P.a.= 7 pa pa woven together into 1 : YO, pass the hook through 1st dc , YO, pull thread , HEB passing the thread crochet 2 sts , ( YO, click hook in next dc , YO, pass thread , HEB and pass the thread through 2 loops crochet ) . Repeat ( -) in each of next 5 dc , YO and pull thread through the 8 sts crochet .ROW = 1 starts here = WS= 7 p.a. work as when they work together in 1 dc , but repeat of (- ) 1 time = about 3 vcsWhen 7 = work as p.a. together in 1 dc , but repeat (-) 2 = vcs vcs total 4
TIP FOR THE CONDUCT OF WORK:When we start a new row with a different color , replace the 1st row p.de cad for 1 pe to secure the thread .SKIPPER :View A.1- A.3 diagrams.-------------------------------------------------- -------------------------------------------GRAB :32 work lazy p.de cad red with crochet hook size 4 mm.ROW 1 (= WS): Work A.1, A.2 work after about 4 vcs and end with A.3. When you have worked the last bp row , cut the thread . Turn the work .ROW 2 (= RS): Change to Green Opal - READ TIP FOR MAKING WORK and work as follows : 5- p.de cad , continue A.3, A.2 work after about 4 vcs and end with A .1 . Cut the thread .ROW 3: Work 3 p.de cad red. Proceed according to pattern row 3 . When you have worked the last p.a. row , cut the thread .ROW 4: Working 3 p.de cad green opal. Continue with A.3 , A.2 and A.1 plots the entire row as before. After working the last 4 p.a. row to 1 p.a. , cut the thread .ROW 5: Work with one p.de cad red. Continue A.1 , A.2 and A.3 to end the row.Then repeat rows 2-5 until work measures approx 20 cm vertically. ATTENTION ! Remember to change the color in each row. Secure the thread.RING : Ensure the wire with 1 e.g. green opal in first st of the previous row in the corner of the gripper . Now work 14 p.de cad , and 1 bp in first st ( = ring ) . Turn work and work 14 bp on the arc ( = ring ) and finish with 1 e.g. in first st . Secure the thread.diagram= P.de cad.Bp = pt in= P.a.= 7 pa pa woven together into 1 : YO, pass the hook through 1st dc , YO, pull thread , HEB passing the thread crochet 2 sts , ( YO, click hook in next dc , YO, pass thread , HEB and pass the thread through 2 loops crochet ) . Repeat ( -) in each of next 5 dc , YO and pull thread through the 8 sts crochet .ROW = 1 starts here = WS= 7 p.a. work as when they work together in 1 dc , but repeat of (- ) 1 time = about 3 vcsWhen 7 = work as p.a. together in 1 dc , but repeat (-) 2 = vcs vcs total 4
No hay comentarios.:
Publicar un comentario