Related Posts Plugin for WordPress, Blogger...

jueves, 15 de mayo de 2014

TAREA DEL JUEVES....

TAREA DEL JUEVES


AGARRADORES DE OLLAS: Instrucciones Ingles y Español...Potholders Instructions English and Spanish ...


Medidas: aprox. 18 x 18 cm
Materiales:  100 g color nº 12, rojo
100 g color nº 11, verde ópalo

AGUJA DE GANCHILLO  TAMAÑO 4 mm – o el tamaño necesario para obtener 1 repetición de A.2 = ancho 4 cm. 
 TIP PARA LA REALIZACIÓN DEL TRABAJO:
Cuando comenzamos una nueva fila con otro color, sustituir el 1er p.de cad de la fila por 1 p.e. para asegurar el hilo.

PATRÓN:
Ver los diagramas A.1-A.3.
---------------------------------------------------------------------------------------------

AGARRADOR:
Trabajar flojo 32 p.de cad en rojo con aguja de ganchillo tamaño 4 mm.
FILA 1 (= LR): Trabajar A.1, después trabajar A.2 un total de 4 vcs y finalizar con A.3. Cuando se ha trabajado el último p.b. de la fila, cortar el hilo. Girar la labor.
FILA 2 (= LD): Cambiar a verde ópalo - LEER TIP PARA LA REALIZACIÓN DEL TRABAJO y trabajar como sigue: 5 p.de cad, continuar con A.3, después trabajar A.2 un total de 4 vcs y finalizar con A.1 . Cortar el hilo.
FILA 3: Trabajar 3 p.de cad con rojo. Continuar de acuerdo con la fila 3 del patrón. Cuando se ha trabajado el último p.a. de la fila , cortar el hilo.
FILA 4: Trabajar 3 p.de cad con verde ópalo. Continuar con los diagramas A.3, A.2 y A.1 la fila entera como antes. Después de trabajar los últimos 4 p.a. de la fila como 1 p.a., cortar el hilo.
FILA 5: Trabajar un p.de cad con color rojo. Continuar con A.1, A.2 y A.3 hasta terminar la fila.
Después repetir las filas 2-5 hasta que la labor mida aprox 20 cm en vertical. ATENCIÓN! Recuerda cambiar el color en cada fila. Asegurar el hilo.

ARGOLLA: Asegurar el hilo con 1 p.e. con verde ópalo en el primer pt de la fila anterior en una esquina del agarrador. Ahora trabajar 14 p.de cad, y 1 p.b. en el primer pt (= argolla). Girar la labor y trabajar 14 p.b. en el arco (= argolla) y finalizar con 1 p.e. en el primer pt. Asegurar el hilo.

Diagrama

p.de cad.
p.b. en el pt
p.a.
7 p.a tejidos juntos en 1 p.a.: HEB, pasar el ganchillo por el 1er p.a., HEB, pasar el hilo, HEB pasar el hilo por los 2 pts del ganchillo, (HEB, pinchar el ganchillo en el sig p.a., HEB, pasar el hilo, HEB y pasar el hilo por los 2 bucles del ganchillo). Repetir (-) en cada uno de los sig 5 p.a., HEB y pasar el hilo por los 8 pts del ganchillo.
FILA 1 comienza aquí = por el LR
trabajar como cuando se trabajan 7 p.a. juntos en 1 p.a., pero repetir de (-) 1 vez = un total de 3 vcs
trabajar como cuando 7 p.a. juntos en 1 p.a., pero repetir de (-) 2 vcs = un total de 4 vcs
*********************************************************
INSTRUCTIONS IN ENGLISH

Measurements: approx. 18 x 18 cmMaterials: 100 g color no 12 , red100 g color # 11 , Green OpalCROCHET SIZE 4 mm - or size needed to get 1 repeat A.2 = 4 cm wide .
 
TIP FOR THE CONDUCT OF WORK:When we start a new row with a different color , replace the 1st row p.de cad for 1 pe to secure the thread .SKIPPER :View A.1- A.3 diagrams.-------------------------------------------------- -------------------------------------------GRAB :32 work lazy p.de cad red with crochet hook size 4 mm.ROW 1 (= WS): Work A.1, A.2 work after about 4 vcs and end with A.3. When you have worked the last bp row , cut the thread . Turn the work .ROW 2 (= RS): Change to Green Opal - READ TIP FOR MAKING WORK and work as follows : 5- p.de cad , continue A.3, A.2 work after about 4 vcs and end with A .1 . Cut the thread .ROW 3: Work 3 p.de cad red. Proceed according to pattern row 3 . When you have worked the last p.a. row , cut the thread .ROW 4: Working 3 p.de cad green opal. Continue with A.3 , A.2 and A.1 plots the entire row as before. After working the last 4 p.a. row to 1 p.a. , cut the thread .ROW 5: Work with one p.de cad red. Continue A.1 , A.2 and A.3 to end the row.Then repeat rows 2-5 until work measures approx 20 cm vertically. ATTENTION ! Remember to change the color in each row. Secure the thread.RING : Ensure the wire with 1 e.g. green opal in first st of the previous row in the corner of the gripper . Now work 14 p.de cad , and 1 bp in first st ( = ring ) . Turn work and work 14 bp on the arc ( = ring ) and finish with 1 e.g. in first st . Secure the thread.diagram= P.de cad.Bp = pt in= P.a.= 7 pa pa woven together into 1 : YO, pass the hook through 1st dc , YO, pull thread , HEB passing the thread crochet 2 sts , ( YO, click hook in next dc , YO, pass thread , HEB and pass the thread through 2 loops crochet ) . Repeat ( -) in each of next 5 dc , YO and pull thread through the 8 sts crochet .ROW = 1 starts here = WS= 7 p.a. work as when they work together in 1 dc , but repeat of (- ) 1 time = about 3 vcsWhen 7 = work as p.a. together in 1 dc , but repeat (-) 2 = vcs vcs total 4
 

FANTASIAS COMBINADAS

FANTASIAS COMBINADAS


BIKINI: Intrucciones Ingles y Español...BIKINI: Instructions English and Spanish ...


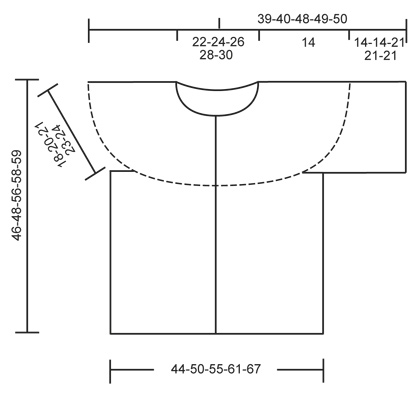
BIKINI, parte de abajo:
Talla: XS – S – M – L – XL – XXL/XXXL
Materiales:  azul denim/blanco

BIKINI, parte de arriba:
Talla: XS – S – M – L – XL – XXL/XXXL
Materiales:  azul denim/blanco

AGUJA DE GANCHILLO  TAMAÑO 4 mm – o el tamaño necesario para obtener 18 p.b. x 20 hileras verticalmente = 10 x 10 cm.
 TIP PARA LA ELABORACIÓN DEL TEJIDO:
HILERA CON P.B.:
Empezar cada hilera con 1 cad antes de continuar con p.b. en cada pt.

TIP PARA DISMINUCIÓN:
Dism 1 p.b. en cada lado de una hilera de la manera sig: Hacer 1 p.b., * insertar la ag en el pt sig, extraer un bucle *, repetir de *a*, hacer una HEB (lazada) y pasar el hilo a través de todos los 3 pts en la ag. Después hacer 1 p.b. en cada pt hasta que resten 3 pts en la hilera, repetir la dism en los 2 pts sig, hacer 1 p.b. en el último pt.

TIP PARA AUMENTO:
Aum 1 pt en cada lado de una hilera haciendo 2 pts en el primero y último pt en la hilera (hacer 1 p.b. en cada uno de los otros p.b.).
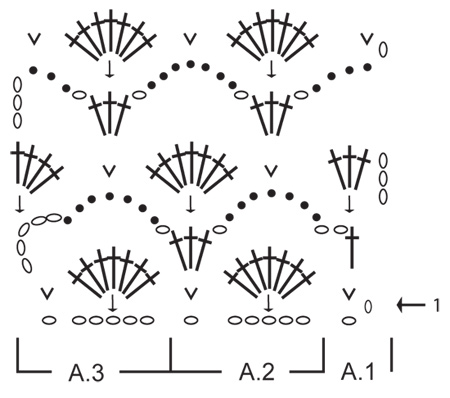
PATRÓN DE ABANICOS:
HILERA 1: Hacer 1 cad, 1 p.b. en el primer pt en la hilera, * saltar 2 pts, 5 p.a. en el pt sig, saltar 2 pts, 1 p.b. en el pt sig *, repetir de *a* en toda la hilera. Terminar con 1 p.b. en el último pt, virar la pieza.
HILERA 2: Hacer 3 cad, 2 p.a. en el primer p.b. en la hilera, * 1 p.b. en el p.a. central de los 5 p.a. de la hilera anterior, 5 p.a. en el p.b. sig *, repetir de *a* en toda la hilera. Terminar con 1 p.b. en el p.a. central de los 5 p.a. de la hilera anterior, 3 p.a. en el último p.b. en la hilera, virar la pieza.
HILERA 3: Hacer 1 cad, 1 p.b. en el primer p.a. en la hilera, * 5 p.a. en el p.b. sig, 1 p.b. en el p.a. central de los 5 p.a. de la hilera anterior *, repetir de *a* en toda la hilera. Terminar con 1 p.b. en la 3ª cad del inicio de la hilera anterior.
------------------------------------------------------

PARTE DE ABAJO DEL BIKINI:
Empezar en la parte de arriba de la pieza del frente y continuar en una sola pieza hasta la parte de arriba de la pieza de atrás.
Mon 45-45-51-51-51-57 cad en ag de ganchillo tamaño 4 mm con Muskat Soft. Trabajar la primera hilera de la manera sig: 1 p.b. en la 3ª cad a partir de la ag, 1 p.b. en cada cad en la hilera = 43-43-49-49-49-55 p.b. (número de pts múltiplo de 6 + 1), virar la pieza – LEER TIP PARA LA ELABORACIÓN DEL TEJIDO – HILERA CON P.B. arriba. Trabajar hileras con p.b., de ida y vuelta, con 1 p.b. en cada p.b.. AL MISMO TIEMPO, dism 1 p.b. en cada lado, en cada hilera, un total de 0-0-6-6-6-12 veces, y, después, en hileras alternas un total de 15-15-12-12-12-9 veces – LEER TIP PARA DISMINUCIÓN = 13 p.b. en todas las tallas (la pieza mide aprox 15 cm). RECUERDE MANTENER LA MISMA TENSIÓN DE TEJIDO DE LA MUESTRA! Continuar trabajando hileras de p.b. con 1 p.b. en cada p.b.. Cuando la pieza mida 19-20-21-22-23-24 cm, empezar la pieza de atrás y ahora medir la pieza desde aquí. Ahora aum 1 p.b. en cada lado – LEER TIP PARA AUMENTO. Repetir los aum en cada lado, en hileras alternas, un total de 3 veces en todas las tallas; en cada hilera un total de 8-8-10-10-10-10 veces, y finalmente en hileras alternas nuevamente un total de 13-13-14-14-14-17 veces = 61-61-67-67-67-73 p.b. (número de pts múltiplo de 6 + 1). Continuar en hileras de p.b. sobre todos los p.b. hasta que la pieza de atrás mida 23-24-25-26-27-28 cm, no cortar el hilo.

ORILLA DE ABANICOS Y CORDONES:
Trabajar la hilera 1-3 en el PATRÓN DE ABANICOS – ver explicación arriba, no cortar el hilo. Después hacer los cordones de la manera sig: Hacer 2 cad, hacer 1 p.b. en la primera cad hecha, * hacer 1 cad, hacer 1 p.b. en el p.b. anterior *, repetir de *a* hasta que el cordón mida aprox 30-40 cm, cortar y asegurar el hilo. Hacer otro cordón de la misma manera y asegurarlo en el otro lado de la orilla de abanicos.
Trabajar la orilla de abanicos y dos cordones de la misma manera en la pieza del frente.

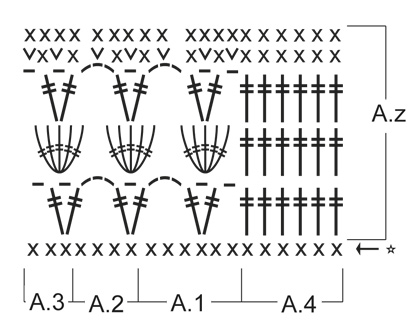
PARTE DE ARRIBA DEL BIKINI:
Trabajado en 2 partes.
Mon 3 cad en ag de ganchillo tamaño 4 mm con Muskat Soft y formar un anillo con 1 p.bjs en la primera cad.
VUELTA 1: Hacer 1 cad, 1 p.b. en la primera cad en el anillo de cad, 2 p.b. en cada una de las 2 cad sig en el anillo de cad (= 6 p.b.), insertar un marcapuntos (MP) y moverlo hacia arriba. Después trabajar en redondo para evitar que el inicio de la vta sea visible.
VUELTA 2: * 2 p.b. en cada uno de los primeros 2 p.b., 1 cad *, repetir de *a* un total de 3 veces (= 4 p.b. con 1 cad en medio).
VUELTA 3: * 1 p.b. en cada uno de los primeros 4 p.b., en la cad sig hacer 1 p.b. + 1 cad (= 1 esquina) + 1 p.b. *, repetir de *a* un total de 3 veces (tenemos ahora 3 esquinas con 6 p.b. entre cada esquina).
VUELTA 4: 1 p.b. en cada p.b., en la cad en cada esquina hacer 1 p.b. + 1 cad + 1 p.b. (tenemos ahora 8 p.b. entre cada esquina).
VUELTA 5: 1 p.b. en cada p.b., en la cad en cada esquina hacer 1 p.b. + 1 cad + 1 p.b. (tenemos ahora 10 p.b. entre cada esquina).
Continuar aum de esta manera hasta que la pieza mida aprox 8-8½-9-9½-10-10½ cm a partir del centro en dirección hacia afuera (o hasta alcanzar el tamaño deseado).
Trabajar la última vta de la manera sig: Trabajar como antes con p.b. y aum a lo largo de 2 de los lados (incl todas las 3 esquinas), después trabajar de la manera sig a lo largo del último lado: 1 p.m.a. en el primer pt, * 1 cad, saltar 1 p.b., 1 p.m.a. en el pt sig *, repetir de *a* hasta la esquina y terminar con 1 p.bjs en la 1ª cad del inicio de la vta (= ojetes). Cortar y asegurar los hilos.
Trabajar la otra parte de la misma manera.

CORDONES:
Hacer 2 cad, hacer 1 p.b. en la primera cad hecha, * hacer 1 cad, hacer 1 p.b. en el p.b. anterior *, repetir de *a* hasta que el cordón mida aprox 110-120-140-150-160-180 cm, cortar y asegurar el hilo. Pasar el cordón de arriba hacia abajo a través de los ojetes en las dos partes del bikini.

Hacer otro cordón de la misma manera, mas con aprox 180-185-190-195-200-210 cm. Pasar el extremo por el LR, a través de la esquina de arriba en una parte del bikini y, después, por el LD a través de la esquina de arriba en la otra parte del bikini (este “aro” deberá quedar en la parte de atrás del cuello cuando se use el bikini). Atar los extremos en el centro de la espalda.

**************************************************

INSTRUCTIONS IN ENGLISH


BIKINI , bottom :Size: XS - S - M - L - XL - XXL / XXXLMaterials: blue denim / whiteBIKINI , top :Size: XS - S - M - L - XL - XXL / XXXLMaterials: blue denim / whiteCROCHET SIZE 4 mm - or size needed to get 18 bp vertically x 20 rows = 10 x 10 cm .
 
TIP FOR KNITTING :ROW WITH P. B. :Start each row with 1 ch before continuing pb in each pt .DECREASING TIP :Dec 1 bp on each side of a row as follows: Work 1 sc , * insert hook in next st , pull loop * , repeat from * to * , make a YO ( loop ) and pull thread through all 3 sts on needle. Then work 1 bp in each st until 3 sts on row, repeat the dec in next 2 sts , work 1 sc in last st .INCREASE TIP :Inc 1 st on each side of a row by working 2 sts in first and last st on row ( work 1 dc in each of the other bp) .PATTERN FANS :ROW 1 : Crochet 1 ch, 1 bp in first st on row, * skip 2 sts , 5 dc in next st , skip 2 sts, 1 bp in next st * , repeat from * to * across the row . Finish with 1 bp in last st , turn piece.ROW 2: Work 3 ch , 2 p.a. in the first b.p. in the row , * 1 bp in p.a. 5 p.a. plant of the previous row 5 p.a. bp in next dc * , repeat from * to * across the row . Finish with 1 bp in p.a. 5 p.a. plant of the previous row 3 p.a. in the last b.p. on row, turn piece.ROW 3: Work 1 ch, 1 bp in the first p.a. in the row , * 5 p.a. bp in sig 1 bp in p.a. 5 p.a. plant of the previous row * , repeat from * to * across the row . Finish with 1 bp in 3rd ch from beg of previous row .-------------------------------------------------- ----BIKINI BOTTOM :Start at the top of the front piece and continue in one piece to the top of the back piece .Mon 45-45-51-51-51-57 ch on hook size 4 mm with Muskat Soft. Work first row as follows: 1 dc in 3rd ch from hook , 1 bp in each ch on row = 43-43-49-49-49-55 bp ( number multiple of 6 sts + 1 ) , turn piece - READ TIP FOR KNITTING - ROW WITH PB above . Working with rows bp round with 1 sc bp each . AT THE SAME TIME dec 1 bp on each side , in each row , a total of 0-0-6-6-6-12 times , and then every other row 15-15-12-12-12-9 total times - READ TIP DECREASE = 13 bp in all sizes (piece measures approx 15 cm). REMEMBER THE SAME POWER OF TISSUE SAMPLE ! Continue working rows of bp 1 b.p. in each sc . When piece measures 19-20-21-22-23-24 cm, start the back piece and now measure piece from here . Now inc 1 bp on each side - READ INCREASE TIP . Repeat inc on each side every other row a total of 3 times in all sizes ; in each row 8-8-10-10-10-10 total times , and finally again in alternate rows 13-13-14-14-14-17 total times = 61-61-67-67-67 -73 bp ( pts number multiple of 6 + 1) . Continue in rows bp on all b.p. until piece measures 23-24-25-26-27-28 cm back , no trimming.SHORE FANS AND LACES :Work row 1-3 PATTERN FANS - see explanation above , no trimming. After making laces follows: Work ch 2, work 1 sc in first ch made ​​, do * ch 1, work 1 sc bp in previous * , repeat from * to * until cord measures approx 30-40 cm , cut and fasten thread . Make another string in the same way and secure it on the other side of the bank of fans.Working Shore fans and two cords in the same way in the front piece .TOP OF BIKINI :Worked in 2 parts .3 ch on hook size 4 mm with Muskat Soft and form a ring with 1 sl st in first ch .ROUND 1: Crochet 1 ch, 1 bp in first ch in ch-ring , 2 bp in each of the 2 ch in ch-ring ( = 6 bp) , insert a marker ( MP ) and move it up . Then work around to prevent the onset of the row is visible.ROUND 2: * 2 bp in each of the first 2 sc , ch 1 * , repeat from * to * a total of 3 times ( = 4 sc with 1 ch between) .ROUND 3: * 1 bp in each of the first 4 sc in next ch work 1 dc + 1 ch (= 1 corner ) + 1 bp * Repeat from * to * a total of 3 times ( we now have three corners with 6 bp between each corner) .ROUND 4 : 1 bp in each sc in each corner ch work 1 dc + 1 ch + 1 bp ( now we have 8 bp between each corner).ROUND 5 : 1 bp in each sc in each corner ch work 1 dc + 1 ch + 1 bp ( we now have 10 bp between each corner).Aum Continue in this manner until piece measures approx 8-8 ½ -9-9 ½ -10-10 ½ cm from the center toward the outside ( or to desired size).Working the last row as so : Work as before with pb aum and along the sides of 2 ( incl all 3 corners) , then work the next way along the last side : 1 pma in first st , * ch 1, skip 1 bp 1 p.m.a. in next st * , repeat from * to * to the corner and finish with 1 sl st in 1st ch from beg of round ( = eyelets ) . Cut and fasten thread .Working the other side the same way .CORDS :Ask ch 2 , work 1 bp in first ch made ​​, do * ch 1, work 1 sc bp in previous * , repeat from * to * until cord measures approx 110-120-140-150-160-180 cm , cut and fasten thread . Thread cord from the top down through the eyelets in the two parts of the bikini .Make another string in the same way , but with approx 180-185-190-195-200-210 cm. Pass the end through the LR through the top corner on a part of the bikini , and then by the LD through the top corner on the other side of the bikini (this " ring " should be on the part of back of the neck when the bikini is used) . Tie the ends in the center of the back.

REFRAN DEL DIA....

REFRAN DEL DIA


LINDO DISENO PARA EL VERANO....CUTE DESIGN FOR SUMMER

LINDO DISENO PARA EL VERANO 
Y LINDOS ATARDECERES.
********
CUTE DESIGN FOR SUMMER
CUTE AND SUNSETS.

Talla: S/M – L – XL – XXL – XXXL
Materiales:
 azul/lila claro

AGUJA DE GANCHILLO  TAMAÑO 5 mm – o el tamaño necesario para obtener 14 p.a.d. x 9 hileras = 10 x 10 cm.
BOTONES  ANGULAR PLATA, 5 piezas para todas las tallas.
 PATRÓN:
Ver diagramas A.1 a A.4.

INFORMACIÓN PARA LA ELABORACIÓN DEL TRABAJO:
Sustituir el primer p.b. en cada hilera de p.b. con 1 cad.
Sustituir el primer p.a.d. en cada hilera de p.a.d. con 4 cad.

TIP PARA AUMENTO: Aum haciendo 2 p.b. en 1 p.b.
------------------------------------------------------

CHAQUETA:
Trabajada de arriba para abajo, de ida y vuelta a partir del centro del frente.

PECHERA:
Mon 156-166-177-188-198 cad flojas (incl 1 cad para virar) en ag de ganchillo tamaño 5 mm con Paris. Hacer la 1ª hilera de la manera sig: Hacer 1 p.b. en la 2ª cad a partir de la ag, * 1 p.b. en cada una de las 3 cad sig, saltar 1 cad *, repetir de *a* y terminar con 1 p.b. en cada una de las últimas 2-4-3-2-4 cad = 117-125-133-141-149 p.b. (= la primera hilera del diagrama) – LEER INFORMACIÓN PARA LA ELABORACIÓN DEL TRABAJO. Continuar trabajando de la manera sig: A.4 (= borde), A.1, A.2 sobre los 96-104-112-120-128 p.b. sig (= 24-26-28-30-32 veces a lo ancho), terminar con A.3 y A.4 (= borde). Trabajar el diagrama A.z 1 vez verticalmente y, AL MISMO TIEMPO, en las últimas 2 hileras, aum 24-28-32-36-40 pts distribuidos equitativamente en cada una de las hileras (= 48-56-64-72-80 pts aum en total) – LEER TIP PARA AUMENTO arriba. NOTA: No aum sobre A.4 = 165-181-197-213-229 pts. Después trabajar el diagrama A.z 1 vez verticalmente (A.2 ahora es trabajado 36-40-44-48-52 veces a lo ancho) y, AL MISMO TIEMPO, en las últimas 2 hileras, aum 22-26-30-34-38 pts distribuidos equitativamente en cada una de las hileras (= 44-52-60-68-76 pts aum en total). NOTA: No aum sobre A.4 = 209-233-257-281-305 pts.

CUERPO:
AHORA MEDIR LA PIEZA A PARTIR DE AQUÍ! Continuar trabajando de la manera sig:
A.4, A.1, A.2 sobre los 24-28-32-36-40 p.b. sig (= 6-7-8-9-10 veces a lo ancho) (pieza del frente), 8 cad (bajo la manga), saltar 40-44-48-52-56 p.b. de la hilera anterior (sisa, los pts serán usados para la manga más adelante), A.2 sobre los 60-68-76-84-92 p.b. sig (pieza de la espalda), 8 cad (bajo la manga), saltar 40-44-48-52-56 p.b. de la hilera anterior (sisa, los pts serán usados para la manga más adelante), A.2 sobre los 24-28-32-36-40 p.b. sig (pieza del frente) y terminar con A.3 y A.4.
Continuar trabajando de la manera sig: Trabajar A.4, A.1, A.2 sobe los 24-28-32-36-40 p.b. sig (= 6-7-8-9-10 veces a lo ancho) (pieza del frente), saltar 8 cad (bajo la manga), A.2 sobre los 60-68-76-84-92 p.b. sig (pieza de la espalda), saltar 8 cad (bajo la manga), A.2 sobre los 24-28-32-36-40 p.b. sig (pieza del frente) y terminar con A.3 y A.4. Repetir A.z hasta que la pieza mida aprox 28-28-35-35-35 cm, terminar después de una repetición completa de A.z. Cortar y asegurar el hilo. La pieza mide aprox 46-48-56-58-59 cm a partir del hombro.

MANGA:
Trabajada en redondo. AHORA MEDIR LA PIEZA A PARTIR DE AQUÍ! Trabajada de arriba para abajo. Comenzar trabajando al centro bajo la manga de la manera sig: Hacer 2 p.b. en la primera cad (de las 8 cad), 1 p.b. en cada una de las 7 cad sig y 1 p.b. en cada uno de los 40-44-48-52-56 p.b. de la pechera = 49-53-57-61-65 p.b. Continuar trabajando de la manera sig: 4 cad, A.1, A.2 sobre los 40-44-48-52-56 pts sig (= 10-11-12-13-14 veces a lo ancho), terminar con A.3 y 1 p.bjs en la cuarta cad. Continuar de esta manera hasta que la pieza mida aprox 14-14-21-21-21 cm, terminar después de una repetición completa de A.z. Cortar y asegurar el hilo.

ENSAMBLAJE:
Hacer una orilla de p.b. alrededor del escote para obtener un bonito acabado de la manera sig: Hacer * 1 p.b. en cada una de las 3 cad sig, saltar 1 cad *, repetir de *a* y terminar con 1 p.b. en cada una de las últimas 4-6-5-4-6 cad = 118-126-134-142-150 p.b.
Coser los botones en el borde izquierdo, separados aprox 7 cm uno del otro. 

Diagrama

p.b.
cad
1 p.a.d.
5 p.a.d. en el arco de cad
p.b. en el arco de cad
esta hilera está explicada en el patrón

**********************************

INSTRUCTIONS IN ENGLISH

Size : S / M - L - XL - XXL - XXXLmaterials: blue / violet light CROCHET HOOK size 5 mm - or size needed to get 14 pad x 9 rows = 10 x 10 cm .ANGLE  SILVER BUTTON , no 534 : 5 pcs for all sizes .
 
SKIPPER :See diagrams A.1 to A.4.INFORMATION FOR THE DEVELOPMENT OF WORK:Replace first bp in each row of b.p. with 1 ch .Replace first p.a.d. in each row of p.a.d. with 4 ch .INCREASE TIP : Inc by making 2 bp 1 b.p.     JACKET:Worked up and down , back and forth from mid front .YOKE:Mon 156-166-177-188-198 loose ch (incl 1 ch to turn with ) on hook size 5 mm with Paris . Make the 1st row as follows: Work 1 sc in 2nd ch from hook , * 1 bp in each of the next 3 ch , skip 1 ch * , repeat from * to * and finish with 1 dc in each of the past cad = 2-4-3-2-4 117-125-133-141-149 bp ( = The first row of the diagram) - READ INFORMATION FOR THE DEVELOPMENT OF WORK . Continue to work the next way : A.4 ( = edge) , A.1 , A.2 on 96-104-112-120-128 pb sig ( = 24-26-28-30-32 times width) , end A.3 and A.4 ( = edge) . Working the diagram Az 1 time vertically , AT THE SAME TIME on the last 2 rows , inc 24-28-32-36-40 sts evenly on each of the rows ( = 48-56-64-72-80 sts aum total) - READ INCREASE TIP above. NOTE : No aum = 165-181-197-213-229 sts on A.4 . Then work diagram Az 1 time vertically ( A.2 is now worked 36-40-44-48-52 times width) AT THE SAME TIME on the last 2 rows , inc 22-26-30-34 - 38 sts evenly on each of the rows ( = 44-52-60-68-76 sts inc in total). NOTE : No aum = 209-233-257-281-305 sts on A.4 .BODY:NOW MEASURE PIECE FROM HERE ! Continue to work the next way :A.4 , A.1 , A.2 on b.p. 24-28-32-36-40 sig ( = 6-7-8-9-10 times width ) ( front piece ) , 8 ch (on the sleeve), skip 40-44-48-52-56 sc of the previous row ( armhole sts for sleeve be used later) , A.2 on 60-68-76-84-92 sc sig ( back piece ) , 8 ch (on the sleeve), skip 40-44-48-52-56 sc of the previous row ( armhole sts for sleeve be used later) , A.2 on 24-28-32-36-40 sc sig ( front piece ) and finish with A.3 and A.4.Continue to work the next way : Working A.4 , A.1 , A.2 sobe 24-28-32-36-40 sc sig ( = 6-7-8-9-10 times width ) ( front piece ) , jumping 8 ch (in the manga) , A.2 on 60-68-76-84-92 sc sig ( back piece ) , jumping 8 ch (in the manga) , A.2 on 24-28-32-36-40 sc sig ( front piece ) and finish with A.3 and A.4. Az Repeat until piece measures approx 28-28-35-35-35 cm, after completing a full repetition of Az Cut and fasten thread . The piece measures approx 46-48-56-58-59 cm from shoulder.MANGA :Worked in the round . NOW MEASURE PIECE FROM HERE ! Worked from the top down . Start working on the center sleeve follows: Work 2 sc in first ch ( of 8 ch ), 1 bp in each of the 7 ch , 1 bp in each b.p. 40-44-48-52-56 of the front = 49-53-57-61-65 bp Continue to work the next way : 4 ch, A.1 , A.2 on 40-44-48-52-56 sts ( = 10-11-12-13-14 times width) , end with A .3 and 1 sl st in fourth ch . Continue like this until piece measures approx 14-14-21-21-21 cm, after completing a full repetition of Az Cut and fasten thread .ASSEMBLY :Make shore bp around the neck to get a nice finish follows: Work * 1 sc in each of the next 3 ch , skip 1 ch * , repeat from * to * and finish with 1 dc in each of the past cad = 4-6-5-4-6 118-126-134-142-150 bpSew buttons on the left edge , about 7 cm apart from each other.
 
diagramBp =cad == 1 p.a.d.= 5 p.a.d. in the arch cadBp = in the arch cad= This row is explained in the pattern
 

Blogging tips