LINDO DISENO PARA EL VERANO
Y LINDOS ATARDECERES.
********
CUTE DESIGN FOR SUMMER
CUTE AND SUNSETS.
CUTE AND SUNSETS.

Talla: S/M – L – XL – XXL – XXXL
Materiales:
azul/lila claro
AGUJA DE GANCHILLO TAMAÑO 5 mm – o el tamaño necesario para obtener 14 p.a.d. x 9 hileras = 10 x 10 cm.
BOTONES ANGULAR PLATA, 5 piezas para todas las tallas.
Materiales:
azul/lila claro
AGUJA DE GANCHILLO TAMAÑO 5 mm – o el tamaño necesario para obtener 14 p.a.d. x 9 hileras = 10 x 10 cm.
BOTONES ANGULAR PLATA, 5 piezas para todas las tallas.
PATRÓN:
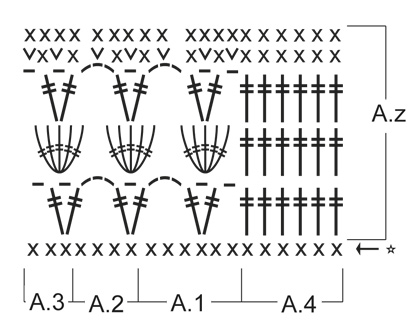
Ver diagramas A.1 a A.4.
INFORMACIÓN PARA LA ELABORACIÓN DEL TRABAJO:
Sustituir el primer p.b. en cada hilera de p.b. con 1 cad.
Sustituir el primer p.a.d. en cada hilera de p.a.d. con 4 cad.
TIP PARA AUMENTO: Aum haciendo 2 p.b. en 1 p.b.
------------------------------------------------------
CHAQUETA:
Trabajada de arriba para abajo, de ida y vuelta a partir del centro del frente.
PECHERA:
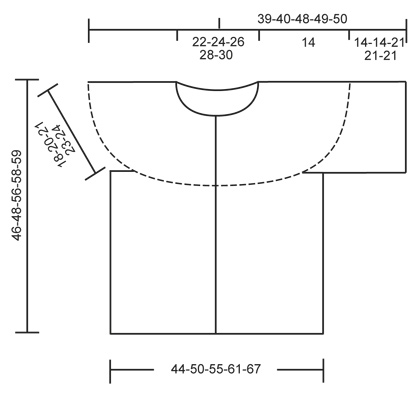
Mon 156-166-177-188-198 cad flojas (incl 1 cad para virar) en ag de ganchillo tamaño 5 mm con Paris. Hacer la 1ª hilera de la manera sig: Hacer 1 p.b. en la 2ª cad a partir de la ag, * 1 p.b. en cada una de las 3 cad sig, saltar 1 cad *, repetir de *a* y terminar con 1 p.b. en cada una de las últimas 2-4-3-2-4 cad = 117-125-133-141-149 p.b. (= la primera hilera del diagrama) – LEER INFORMACIÓN PARA LA ELABORACIÓN DEL TRABAJO. Continuar trabajando de la manera sig: A.4 (= borde), A.1, A.2 sobre los 96-104-112-120-128 p.b. sig (= 24-26-28-30-32 veces a lo ancho), terminar con A.3 y A.4 (= borde). Trabajar el diagrama A.z 1 vez verticalmente y, AL MISMO TIEMPO, en las últimas 2 hileras, aum 24-28-32-36-40 pts distribuidos equitativamente en cada una de las hileras (= 48-56-64-72-80 pts aum en total) – LEER TIP PARA AUMENTO arriba. NOTA: No aum sobre A.4 = 165-181-197-213-229 pts. Después trabajar el diagrama A.z 1 vez verticalmente (A.2 ahora es trabajado 36-40-44-48-52 veces a lo ancho) y, AL MISMO TIEMPO, en las últimas 2 hileras, aum 22-26-30-34-38 pts distribuidos equitativamente en cada una de las hileras (= 44-52-60-68-76 pts aum en total). NOTA: No aum sobre A.4 = 209-233-257-281-305 pts.
CUERPO:
AHORA MEDIR LA PIEZA A PARTIR DE AQUÍ! Continuar trabajando de la manera sig:
A.4, A.1, A.2 sobre los 24-28-32-36-40 p.b. sig (= 6-7-8-9-10 veces a lo ancho) (pieza del frente), 8 cad (bajo la manga), saltar 40-44-48-52-56 p.b. de la hilera anterior (sisa, los pts serán usados para la manga más adelante), A.2 sobre los 60-68-76-84-92 p.b. sig (pieza de la espalda), 8 cad (bajo la manga), saltar 40-44-48-52-56 p.b. de la hilera anterior (sisa, los pts serán usados para la manga más adelante), A.2 sobre los 24-28-32-36-40 p.b. sig (pieza del frente) y terminar con A.3 y A.4.
Continuar trabajando de la manera sig: Trabajar A.4, A.1, A.2 sobe los 24-28-32-36-40 p.b. sig (= 6-7-8-9-10 veces a lo ancho) (pieza del frente), saltar 8 cad (bajo la manga), A.2 sobre los 60-68-76-84-92 p.b. sig (pieza de la espalda), saltar 8 cad (bajo la manga), A.2 sobre los 24-28-32-36-40 p.b. sig (pieza del frente) y terminar con A.3 y A.4. Repetir A.z hasta que la pieza mida aprox 28-28-35-35-35 cm, terminar después de una repetición completa de A.z. Cortar y asegurar el hilo. La pieza mide aprox 46-48-56-58-59 cm a partir del hombro.
MANGA:
Trabajada en redondo. AHORA MEDIR LA PIEZA A PARTIR DE AQUÍ! Trabajada de arriba para abajo. Comenzar trabajando al centro bajo la manga de la manera sig: Hacer 2 p.b. en la primera cad (de las 8 cad), 1 p.b. en cada una de las 7 cad sig y 1 p.b. en cada uno de los 40-44-48-52-56 p.b. de la pechera = 49-53-57-61-65 p.b. Continuar trabajando de la manera sig: 4 cad, A.1, A.2 sobre los 40-44-48-52-56 pts sig (= 10-11-12-13-14 veces a lo ancho), terminar con A.3 y 1 p.bjs en la cuarta cad. Continuar de esta manera hasta que la pieza mida aprox 14-14-21-21-21 cm, terminar después de una repetición completa de A.z. Cortar y asegurar el hilo.
ENSAMBLAJE:
Hacer una orilla de p.b. alrededor del escote para obtener un bonito acabado de la manera sig: Hacer * 1 p.b. en cada una de las 3 cad sig, saltar 1 cad *, repetir de *a* y terminar con 1 p.b. en cada una de las últimas 4-6-5-4-6 cad = 118-126-134-142-150 p.b.
Coser los botones en el borde izquierdo, separados aprox 7 cm uno del otro.
Ver diagramas A.1 a A.4.
INFORMACIÓN PARA LA ELABORACIÓN DEL TRABAJO:
Sustituir el primer p.b. en cada hilera de p.b. con 1 cad.
Sustituir el primer p.a.d. en cada hilera de p.a.d. con 4 cad.
TIP PARA AUMENTO: Aum haciendo 2 p.b. en 1 p.b.
------------------------------------------------------
CHAQUETA:
Trabajada de arriba para abajo, de ida y vuelta a partir del centro del frente.
PECHERA:
Mon 156-166-177-188-198 cad flojas (incl 1 cad para virar) en ag de ganchillo tamaño 5 mm con Paris. Hacer la 1ª hilera de la manera sig: Hacer 1 p.b. en la 2ª cad a partir de la ag, * 1 p.b. en cada una de las 3 cad sig, saltar 1 cad *, repetir de *a* y terminar con 1 p.b. en cada una de las últimas 2-4-3-2-4 cad = 117-125-133-141-149 p.b. (= la primera hilera del diagrama) – LEER INFORMACIÓN PARA LA ELABORACIÓN DEL TRABAJO. Continuar trabajando de la manera sig: A.4 (= borde), A.1, A.2 sobre los 96-104-112-120-128 p.b. sig (= 24-26-28-30-32 veces a lo ancho), terminar con A.3 y A.4 (= borde). Trabajar el diagrama A.z 1 vez verticalmente y, AL MISMO TIEMPO, en las últimas 2 hileras, aum 24-28-32-36-40 pts distribuidos equitativamente en cada una de las hileras (= 48-56-64-72-80 pts aum en total) – LEER TIP PARA AUMENTO arriba. NOTA: No aum sobre A.4 = 165-181-197-213-229 pts. Después trabajar el diagrama A.z 1 vez verticalmente (A.2 ahora es trabajado 36-40-44-48-52 veces a lo ancho) y, AL MISMO TIEMPO, en las últimas 2 hileras, aum 22-26-30-34-38 pts distribuidos equitativamente en cada una de las hileras (= 44-52-60-68-76 pts aum en total). NOTA: No aum sobre A.4 = 209-233-257-281-305 pts.
CUERPO:
AHORA MEDIR LA PIEZA A PARTIR DE AQUÍ! Continuar trabajando de la manera sig:
A.4, A.1, A.2 sobre los 24-28-32-36-40 p.b. sig (= 6-7-8-9-10 veces a lo ancho) (pieza del frente), 8 cad (bajo la manga), saltar 40-44-48-52-56 p.b. de la hilera anterior (sisa, los pts serán usados para la manga más adelante), A.2 sobre los 60-68-76-84-92 p.b. sig (pieza de la espalda), 8 cad (bajo la manga), saltar 40-44-48-52-56 p.b. de la hilera anterior (sisa, los pts serán usados para la manga más adelante), A.2 sobre los 24-28-32-36-40 p.b. sig (pieza del frente) y terminar con A.3 y A.4.
Continuar trabajando de la manera sig: Trabajar A.4, A.1, A.2 sobe los 24-28-32-36-40 p.b. sig (= 6-7-8-9-10 veces a lo ancho) (pieza del frente), saltar 8 cad (bajo la manga), A.2 sobre los 60-68-76-84-92 p.b. sig (pieza de la espalda), saltar 8 cad (bajo la manga), A.2 sobre los 24-28-32-36-40 p.b. sig (pieza del frente) y terminar con A.3 y A.4. Repetir A.z hasta que la pieza mida aprox 28-28-35-35-35 cm, terminar después de una repetición completa de A.z. Cortar y asegurar el hilo. La pieza mide aprox 46-48-56-58-59 cm a partir del hombro.
MANGA:
Trabajada en redondo. AHORA MEDIR LA PIEZA A PARTIR DE AQUÍ! Trabajada de arriba para abajo. Comenzar trabajando al centro bajo la manga de la manera sig: Hacer 2 p.b. en la primera cad (de las 8 cad), 1 p.b. en cada una de las 7 cad sig y 1 p.b. en cada uno de los 40-44-48-52-56 p.b. de la pechera = 49-53-57-61-65 p.b. Continuar trabajando de la manera sig: 4 cad, A.1, A.2 sobre los 40-44-48-52-56 pts sig (= 10-11-12-13-14 veces a lo ancho), terminar con A.3 y 1 p.bjs en la cuarta cad. Continuar de esta manera hasta que la pieza mida aprox 14-14-21-21-21 cm, terminar después de una repetición completa de A.z. Cortar y asegurar el hilo.
ENSAMBLAJE:
Hacer una orilla de p.b. alrededor del escote para obtener un bonito acabado de la manera sig: Hacer * 1 p.b. en cada una de las 3 cad sig, saltar 1 cad *, repetir de *a* y terminar con 1 p.b. en cada una de las últimas 4-6-5-4-6 cad = 118-126-134-142-150 p.b.
Coser los botones en el borde izquierdo, separados aprox 7 cm uno del otro.
Diagrama

|
= | p.b. |

|
= | cad |

|
= | 1 p.a.d. |

|
= | 5 p.a.d. en el arco de cad |

|
= | p.b. en el arco de cad |

|
= | esta hilera está explicada en el patrón |
**********************************
INSTRUCTIONS IN ENGLISH
INSTRUCTIONS IN ENGLISH
Size : S / M - L - XL - XXL - XXXLmaterials: blue / violet light CROCHET HOOK size 5 mm - or size needed to get 14 pad x 9 rows = 10 x 10 cm .ANGLE SILVER BUTTON , no 534 : 5 pcs for all sizes .
SKIPPER :See diagrams A.1 to A.4.INFORMATION FOR THE DEVELOPMENT OF WORK:Replace first bp in each row of b.p. with 1 ch .Replace first p.a.d. in each row of p.a.d. with 4 ch .INCREASE TIP : Inc by making 2 bp 1 b.p. JACKET:Worked up and down , back and forth from mid front .YOKE:Mon 156-166-177-188-198 loose ch (incl 1 ch to turn with ) on hook size 5 mm with Paris . Make the 1st row as follows: Work 1 sc in 2nd ch from hook , * 1 bp in each of the next 3 ch , skip 1 ch * , repeat from * to * and finish with 1 dc in each of the past cad = 2-4-3-2-4 117-125-133-141-149 bp ( = The first row of the diagram) - READ INFORMATION FOR THE DEVELOPMENT OF WORK . Continue to work the next way : A.4 ( = edge) , A.1 , A.2 on 96-104-112-120-128 pb sig ( = 24-26-28-30-32 times width) , end A.3 and A.4 ( = edge) . Working the diagram Az 1 time vertically , AT THE SAME TIME on the last 2 rows , inc 24-28-32-36-40 sts evenly on each of the rows ( = 48-56-64-72-80 sts aum total) - READ INCREASE TIP above. NOTE : No aum = 165-181-197-213-229 sts on A.4 . Then work diagram Az 1 time vertically ( A.2 is now worked 36-40-44-48-52 times width) AT THE SAME TIME on the last 2 rows , inc 22-26-30-34 - 38 sts evenly on each of the rows ( = 44-52-60-68-76 sts inc in total). NOTE : No aum = 209-233-257-281-305 sts on A.4 .BODY:NOW MEASURE PIECE FROM HERE ! Continue to work the next way :A.4 , A.1 , A.2 on b.p. 24-28-32-36-40 sig ( = 6-7-8-9-10 times width ) ( front piece ) , 8 ch (on the sleeve), skip 40-44-48-52-56 sc of the previous row ( armhole sts for sleeve be used later) , A.2 on 60-68-76-84-92 sc sig ( back piece ) , 8 ch (on the sleeve), skip 40-44-48-52-56 sc of the previous row ( armhole sts for sleeve be used later) , A.2 on 24-28-32-36-40 sc sig ( front piece ) and finish with A.3 and A.4.Continue to work the next way : Working A.4 , A.1 , A.2 sobe 24-28-32-36-40 sc sig ( = 6-7-8-9-10 times width ) ( front piece ) , jumping 8 ch (in the manga) , A.2 on 60-68-76-84-92 sc sig ( back piece ) , jumping 8 ch (in the manga) , A.2 on 24-28-32-36-40 sc sig ( front piece ) and finish with A.3 and A.4. Az Repeat until piece measures approx 28-28-35-35-35 cm, after completing a full repetition of Az Cut and fasten thread . The piece measures approx 46-48-56-58-59 cm from shoulder.MANGA :Worked in the round . NOW MEASURE PIECE FROM HERE ! Worked from the top down . Start working on the center sleeve follows: Work 2 sc in first ch ( of 8 ch ), 1 bp in each of the 7 ch , 1 bp in each b.p. 40-44-48-52-56 of the front = 49-53-57-61-65 bp Continue to work the next way : 4 ch, A.1 , A.2 on 40-44-48-52-56 sts ( = 10-11-12-13-14 times width) , end with A .3 and 1 sl st in fourth ch . Continue like this until piece measures approx 14-14-21-21-21 cm, after completing a full repetition of Az Cut and fasten thread .ASSEMBLY :Make shore bp around the neck to get a nice finish follows: Work * 1 sc in each of the next 3 ch , skip 1 ch * , repeat from * to * and finish with 1 dc in each of the past cad = 4-6-5-4-6 118-126-134-142-150 bpSew buttons on the left edge , about 7 cm apart from each other.
diagramBp =cad == 1 p.a.d.= 5 p.a.d. in the arch cadBp = in the arch cad= This row is explained in the pattern
No hay comentarios.:
Publicar un comentario